
Introduction: Why Outdoor Lighting Matters for Florida Homes
In Florida, where beautiful evenings and year-round outdoor living are part of the lifestyle, outdoor lighting is more than just an aesthetic upgrade. It’s a critical element for home security, safety, property value, and compliance with local coastal regulations designed to protect wildlife and reduce light pollution. Upgrading your outdoor lighting can deter crime, prevent accidents, showcase landscaping, and even contribute to energy efficiency—if done right. However, many homeowners underestimate the complexity of outdoor lighting projects in the Sunshine State. Between local permitting, unique coastal wildlife protections (especially concerning sea turtles), and the need for weather-resistant materials, there are several pitfalls to avoid. This comprehensive, step-by-step guide is tailored for Florida homeowners looking to upgrade their outdoor lighting systems, whether you live inland, on the coast, or somewhere in between. Get ready to illuminate your property safely, stylishly, and legally, with strategies to maximize both curb appeal and compliance.
Step 1: Planning Your Outdoor Lighting Upgrade
Assessing Your Needs and Goals
Begin by defining the purpose of your lighting upgrade. Are you aiming to improve security, increase visibility, create ambiance, or enhance landscaping features? Walk your property at night and note dark zones, trip hazards, and existing fixtures that need replacement or repositioning. Consider:
- Security lighting: Focus on entrances, driveways, and blind spots.
- Pathway and step lighting: Eliminate tripping hazards and make walkways safer.
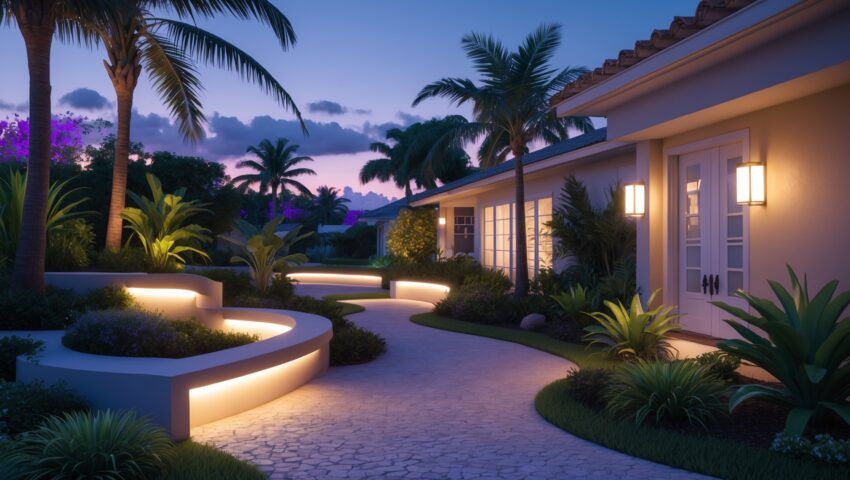
- Accent lighting: Highlight architectural or landscaping features.
- Deck and patio lighting: Enhance outdoor entertaining spaces.
Choosing Lighting Types and Technologies
Today’s options span from classic hardwired fixtures to solar-powered lights and smart LED systems. In Florida, prioritize weather-resistant, corrosion-proof materials (such as powder-coated aluminum or marine-grade stainless steel) and fixtures rated for wet locations. Consider:
- LED fixtures: Offer energy efficiency, long lifespan, and reduced heat output.
- Solar lights: Great for pathways and areas with ample sunlight, but check warranties for hurricane-prone areas.
- Smart lighting: Allows remote control, timers, and automation to adapt for security and energy savings.
Designing for Coastal and Wildlife Compliance
If your home is near the coast, you must comply with Florida’s outdoor lighting ordinances that protect sea turtles and other wildlife. This typically means using warm-colored, downward-shielded fixtures and minimizing light spillage toward beaches. Start by consulting local guidelines or resources such as the Florida Fish and Wildlife Conservation Commission’s lighting recommendations.
Step 2: Understanding Permitting and Legal Requirements
When Is a Permit Required?
Most Florida municipalities require permits for new outdoor lighting installations, especially if wiring is involved or if the project exceeds a certain wattage or involves structural changes. Typical permit-requiring scenarios include:
- Installing or relocating electrical circuits outdoors
- Adding new hardwired fixtures
- Installing lighting poles or posts
Solar-powered, low-voltage, and plug-in fixtures may not require permits, but always verify with your local building department. Working without required permits can void home insurance and create legal headaches when selling your home.
How to Apply for a Permit
Follow these practical steps to streamline the permitting process:
- Contact your city or county building department for lighting-specific guidelines
- Prepare a site plan showing fixture locations, wiring routes, and distances from protected areas (such as beaches or wetlands)
- Submit fixture specifications, especially if you’re in a coastal zone (include kelvin color temperature and shielding details)
- Pay applicable fees and schedule required inspections
Keep all documentation for your records and future real estate transactions.
Special Coastal Lighting Regulations
Florida’s coastal communities often enforce stricter lighting rules, especially during turtle nesting season (March through October). Common requirements include:
- Using fixtures with a color temperature of 3000K or below (amber or warm white)
- Downward-directed, fully shielded lights
- Automatic controls (timers or motion sensors) to minimize night lighting
- Vegetation or structural barriers to block light from reaching the beach
Non-compliance can result in hefty fines, especially if your lighting is found to disorient nesting turtles or hatchlings.
Step 3: Budgeting and Cost Breakdown
Material and Fixture Costs
Outdoor lighting costs in Florida vary widely by fixture type, material, and technology:
- Basic solar path lights: $20–$60 per fixture
- Hardwired LED wall sconces: $50–$200 per fixture
- Coastal-rated, corrosion-proof fixtures: $75–$400 per fixture
- Smart lighting controls: $40–$200 per controller or switch
Installation and Labor
Labor costs depend on project complexity and local rates:
- Licensed electrician: $60–$120 per hour
- Outdoor lighting specialist or landscape contractor: $70–$150 per hour
- DIY installation: Save on labor but factor in tool rentals and extra time
Expect a typical modest upgrade (6–10 fixtures, basic wiring) to cost $1,000–$3,500 installed, while large-scale or high-end projects can exceed $10,000.
Permit and Inspection Fees
Florida permit fees range from $50–$300, depending on municipality and project size. Inspection fees may be included or charged separately. Coastal compliance reviews can add $100–$250.
Ongoing Maintenance and Energy Costs
LED and solar fixtures have low ongoing costs, but plan for periodic cleaning, battery replacement (for solar units), and bulb changes. Smart systems may require occasional software updates. Budget $50–$150 annually for maintenance and minor repairs.
Step 4: Tools and Equipment Checklist
For DIYers or those overseeing contractors, ensure you have the right tools and safety equipment:
- Voltage tester and circuit tracer
- Wire cutters, strippers, and crimpers
- Drill with masonry and wood bits
- Outdoor-rated extension cords
- Shovel or trenching tool (for underground wiring)
- Weatherproof electrical box and connectors
- Personal protective equipment: gloves, safety glasses, non-slip shoes
- Ladder (fiberglass recommended for electrical safety)
Never substitute indoor-rated materials or tools for outdoor projects in Florida’s humid, storm-prone climate.
Step 5: Installation Best Practices
Site Preparation
Mark all underground utilities before digging. In Florida, call 811 at least two business days prior to any excavation. Clear the installation area of debris, mulch, and vegetation.
Wiring and Fixture Placement
- Use UF-B (underground feeder) cable for direct burial, or run conduit for extra protection
- Maintain proper depth—typically 6–12 inches for low-voltage, 18–24 inches for line voltage
- Anchor fixtures securely to resist wind and rain
- Seal all connections with waterproof gel or heat-shrink tubing
- Position fixtures to minimize glare and avoid shining into neighboring properties or protected habitats
Smart Lighting Integration
For app-based or automated systems, follow manufacturer setup instructions. Connect to your home Wi-Fi and calibrate timers or motion detectors to avoid triggering lights unnecessarily. Regularly update firmware to maintain security and compatibility.
Step 6: Coastal and Wildlife-Safe Lighting Strategies
Shielding and Directionality
Install fixtures with full cut-off shields to direct light downward and eliminate upward or outward glare. Use plantings or fences to further block stray light from reaching sensitive areas.
Color Temperature and Intensity
Opt for amber or warm white (≤3000K) bulbs, which are less disruptive to wildlife and preserve night vision. Use the lowest effective wattage for safety and visibility.
Automation for Turtle Season
- Set timers to turn off non-essential lights after 10 PM during March–October
- Employ motion sensors for security lighting, so they activate only when needed
- Consider dimmers to reduce intensity in beach-facing fixtures
Step 7: Maintenance and Troubleshooting
Routine Checks
- Inspect fixtures bi-monthly for corrosion, water intrusion, or loose mounts
- Clean lenses and solar panels to maintain brightness
- Test all GFCI outlets and replace batteries annually
Troubleshooting Common Issues
- Flickering lights: Check for loose connections or water ingress
- Non-working solar fixtures: Clean panels and replace rechargeable batteries
- Tripped circuits: Inspect for ground faults or damaged wiring, especially after storms
Log issues and repairs in a maintenance journal for warranty and resale purposes.
Step 8: Insurance and Documentation Essentials
Updating Your Homeowner’s Policy
Notify your insurer of any major outdoor electrical upgrades. Some policies offer discounts for security lighting or smart home features. Keep copies of permits, inspection reports, and contractor invoices in a safe place.
Legal Protections
- Ensure all work is performed by licensed professionals where required
- Retain proof of coastal compliance if your home is in a regulated area
- Photograph installations for insurance and future buyers
Conclusion: Lighting Up Florida Homes Responsibly
Upgrading your outdoor lighting in Florida isn’t just about picking attractive fixtures or boosting curb appeal. It’s a project that requires careful planning, knowledge of local permitting and coastal compliance, and a commitment to safety—for your family, your property, and the region’s unique wildlife. By following a step-by-step process, you’ll avoid common pitfalls like unpermitted work, non-compliant lighting that risks fines, or installations that fail prematurely in Florida’s harsh climate. Prioritize weather-resistant materials, energy-efficient technologies, and designs that respect both your privacy and local wildlife. Always verify local requirements before starting, and don’t hesitate to consult with licensed professionals for complex wiring or coastal zone projects. With the right approach, you’ll enjoy the benefits of enhanced security, usability, and beauty, all while protecting your investment and the natural environment that makes Florida special. Illuminate your home with confidence, knowing you’ve done it right from the ground up.
If I want to maximize both safety and energy efficiency on a tight budget, which pathway or accent lighting options do you suggest for Florida homes? Are solar-powered lights reliable enough for the frequent rain and weather changes here?
For safety and energy efficiency on a budget, consider LED pathway or accent lights since they use less electricity and last longer. Solar-powered lights are a popular, cost-effective choice in Florida, but pick models rated for wet conditions to withstand rain and humidity. Some solar lights have weatherproof designs and brighter LEDs, making them more dependable during frequent storms and cloudy days.
Once I’ve figured out the areas that need more lighting for safety, what’s the next step? Do you suggest hiring a professional right away, or is it feasible for a homeowner to do some of the installation themselves?
After identifying areas that need more lighting, the next step is to plan your lighting layout and select appropriate fixtures that suit your needs and meet any local codes or coastal regulations. Installing simple fixtures like solar path lights or plug-in lights can be a manageable DIY project for many homeowners. However, for hardwired lights or more complex electrical work, hiring a licensed professional is strongly recommended for safety and code compliance.
Could you explain more about the specific coastal wildlife regulations in Florida, especially regarding sea turtles? I’m not sure what kind of lighting is allowed or how to make sure my upgrade won’t cause any compliance issues near the beach.
Florida has strict regulations to protect sea turtles, especially during nesting season (March through October). Outdoor lighting near beaches must be low, shielded, and emit long-wavelength (amber or red) light to reduce confusion for hatchlings. Avoid white or bright lights facing the beach, and use fixtures that keep light from spilling onto the sand. Before upgrading, check with your local municipality or Florida Fish and Wildlife Conservation Commission for approved lighting options and specific guidelines for your area.
While planning to upgrade my outdoor lighting for both security and ambiance, I’m wondering how to balance brightness without running into issues with local light pollution regulations. Any tips on fixture placement or features to stay compliant yet effective?
To balance security and ambiance while staying within light pollution regulations, choose fixtures with full cut-off or shielded designs that direct light downward. Place lights only where needed—pathways, entry points, and key landscape features. Use bulbs with lower lumen output and warmer color temperatures to minimize glare. Install dimmers or motion sensors to keep brightness low except when higher illumination is necessary. This setup enhances safety and appearance while helping you comply with local rules.
Once I’ve identified dark zones and chosen fixtures, how long should the typical permit approval process take in Florida, and are there ways to speed it up if the lighting upgrade is time-sensitive?
In most parts of Florida, the permit approval process for outdoor lighting upgrades usually takes one to three weeks, depending on your local municipality’s workload. To speed things up, make sure your application is complete, includes detailed plans, and complies with local and coastal lighting codes. If your project is urgent, some counties may offer expedited review for an additional fee—contact your local permitting office to ask about this option.
If I live just a block from the coast in Florida, what are the main things I need to check to make sure my new outdoor lights are compliant with sea turtle protections and any coastal regulations?
Since you live close to the coast, you’ll want to use turtle-friendly outdoor lighting. This generally means choosing fixtures and bulbs that are low-wattage, shielded, and emit long-wavelength amber or red light. Make sure the light isn’t visible from the beach. Also, double-check your city or county’s specific coastal lighting ordinances and get any required permits before installing the lights.
The guide mentions weather-resistant and corrosion-proof materials for outdoor lighting in Florida. Are there particular brands or certifications homeowners should look for that stand up best to the humidity and salt exposure common in the state?
For Florida’s humid and coastal conditions, look for outdoor lighting fixtures made from marine-grade stainless steel, solid brass, or powder-coated aluminum. Homeowners should check for UL Wet Location or ETL Wet Location certification, which ensures the product is designed for direct exposure to rain and salt air. Brands like Kichler, Hinkley, and Sea Gull Lighting are often recognized for their durability in coastal environments.
I noticed the article mentions needing to follow coastal wildlife protections, especially for sea turtles. How can I make sure my new outdoor lights won’t negatively impact local wildlife, and are there specific fixtures or settings I should be looking for?
To protect local wildlife like sea turtles, choose outdoor lighting that is low-wattage, shielded, and emits long-wavelength (amber or red) light, which is less disruptive. Make sure fixtures are directed downward and minimize light spill onto beaches. Also, use timers or motion sensors to limit light duration. Look for products labeled as ‘wildlife-friendly’ or ‘turtle-safe’—these are designed specifically to meet coastal compliance requirements.
When planning to switch over to solar-powered or smart LED systems outdoors, is it generally better to replace everything at once or can I phase the project in to spread out the costs and effort?
You can definitely phase in your upgrade to solar-powered or smart LED outdoor lighting. Many homeowners choose to replace fixtures gradually to manage costs and effort, starting with high-priority areas like pathways or entryways. Just make sure new components are compatible with your existing system and follow safety guidelines at each stage. This approach also lets you learn and adjust as you go.